Passive Logger Data Upload Guide for Command Center Shipments
Last updated: November 24, 2025
Purpose:
This guide provides clear, step-by-step instructions for converting and uploading passive TempTale logger data into the PAXAFE Control Tower. Proper upload ensures temperature traceability and supports quality decision-making throughout the shipment lifecycle.
Introduction
This guide is intended to help team members accurately and consistently upload passive temperature logger (TempTale) data into the PAXAFE Control Tower platform. This process ensures that temperature records are accessible for quality decision-making, audit readiness, and long-term traceability.
You will be guided through:
Logging into the PAXAFE Control Tower and locating the correct shipment,
Navigating to the Documents and Passive Logger Data sections,
Converting raw .ttv files from TempTale devices into readable Excel reports via the Sensitech TempTale Manager Desktop,
Uploading temperature data and related documentation in supported formats (.xlsx, .pdf, .zip),
Viewing and verifying parsed logger data under the Devices tab.
This guide is designed for ease of use and to reduce variability in how temperature data is handled and recorded across teams.
STEP 1 – Login and find the right shipment for the logger
Navigate to the PAXAFE Control Tower portal.
Log in using your credentials.
Use the search bar to locate the specific shipment associated with the TempTale logger data.
✅ Tip: You can search by Shipment ID or Tracking Number to narrow results quickly.
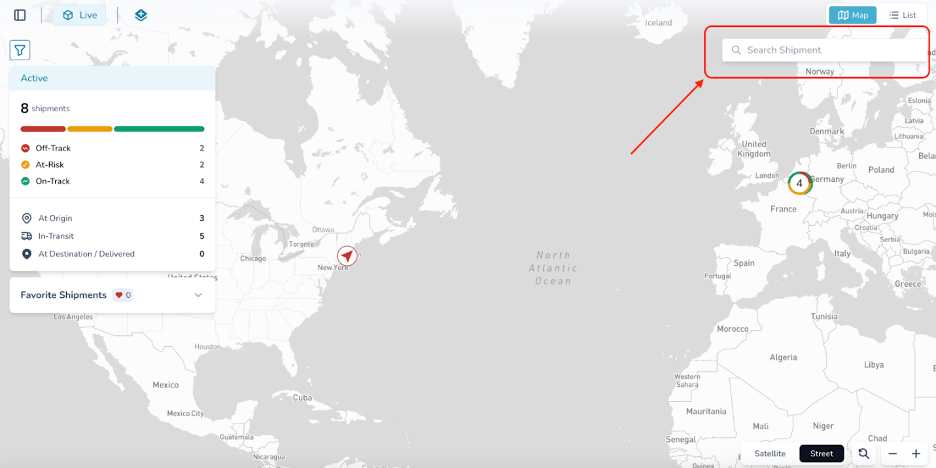
Figure 1 Search for the appropriate shipment by ID or tracking number to begin the upload process.
STEP 2 – Navigate to Docs icon
Once you have selected the correct shipment from the search results:
Scroll to the bottom of the shipment details page.
Click the “Docs” icon to open the Documents section for the selected shipment.
This section allows you to manage and upload shipment-specific documentation, including temperature logger data.
✅ Tip: If you're unsure whether you’ve selected the correct shipment, double-check the shipment ID and associated metadata (e.g., origin, destination, or tracking number) at the top of the page or in the bottom under the “Additional Details” collapsible heading.
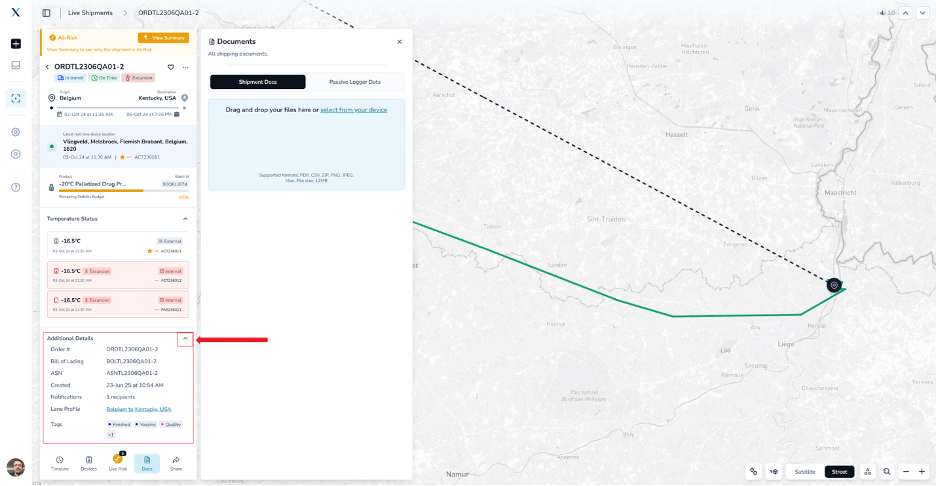
Figure 2 Check the collapsible “Additional Details” section for full shipment metadata.
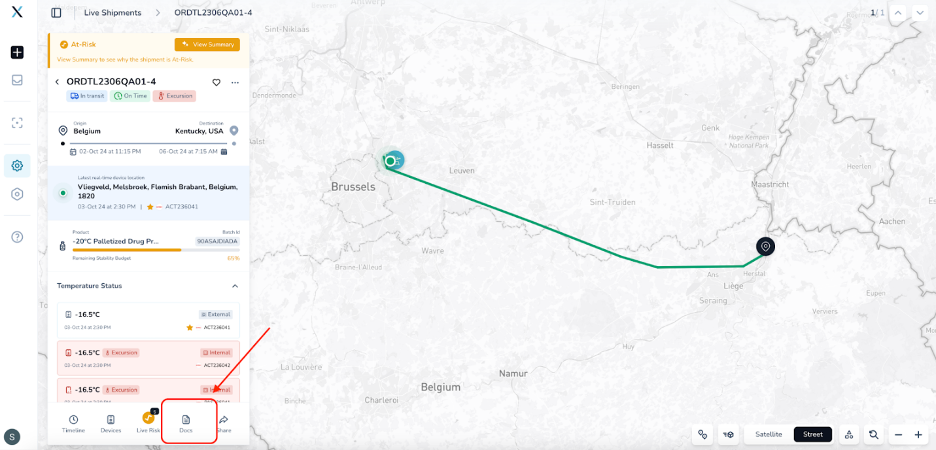
Figure 2a Click the Docs tab at the bottom of the shipment details to access document upload options.
STEP 3 – Navigate to Passive Logger Data tab
After clicking the “Docs” icon, a new Documents window will appear.
Within this window, locate and click on the “Passive Logger Data” tab.
This tab is specifically used for uploading temperature logger files (e.g., from TempTale or other passive devices).
✅ Tip: Ensure you are not uploading temperature data into the general document tabs. Only use “Passive Logger Data” to ensure proper parsing and traceability of the files.
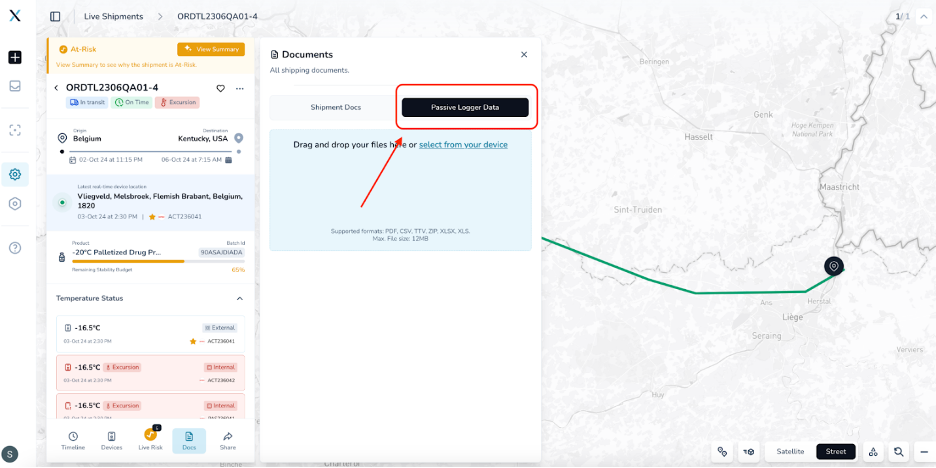
Figure 3 The Passive Logger Data tab, where TempTale files must be uploaded for parsing and association with the correct shipment.
STEP 4 – Preparing your files
To ensure the temperature data can be parsed and stored properly in PAXAFE, you'll need to convert your raw logger files (TTV) into a readable format.
Convert .TTV Files to Excel Format (via Sensitech TempTale Manager Desktop)
From your TempTale logger, you’ll typically download .TTV files. These need to be converted to .xls format before uploading. To do this:
Open the Sensitech TempTale Manager Desktop.
Click “Select Files to View” and choose the .TTV file(s) you wish to convert.
Click “OK” to open the selected files within the platform.
Once the data is displayed, click “Export to Excel” to download the file in .xls format.
⚠ Note: Sensitech's TempTale Manager Desktop interface may evolve. Follow the general approach of opening your logger file and exporting it as an Excel document. Refer to internal training, Sensitech TempTale Desktop documentation, or contact support if needed.
File Naming Convention (Recommended)
Rename your Excel file using this format to make it easy to trace later:
[BoL]_[YYYY-MM-DD].xls
Example: 804567891_2025-06-28.xls
STEP 5 – Upload your files
Once your files are prepared:
Upload the converted Excel file (from the TempTale logger) in the “Passive Logger Data” tab.
Upload all other supporting documents (e.g., packing list, certificate of analysis, etc.) under the “Shipment Docs” tab.
You may upload individual files or compress them into a .zip file. Be sure to upload each file type to the correct section:
Tab | Purpose | Supported Formats |
Passive Logger Data | TempTale logger temperature data only | .xls, .xlsx, .pdf, .zip |
Shipment Docs | All other shipment documentation | .pdf, .csv, .zip, .png, .jpeg |
✅ Important: Do not upload temperature files in the “Shipment Docs” tab. Only use the “Passive Logger Data” tab for logger data so that the system can correctly parse and associate it with the shipment.
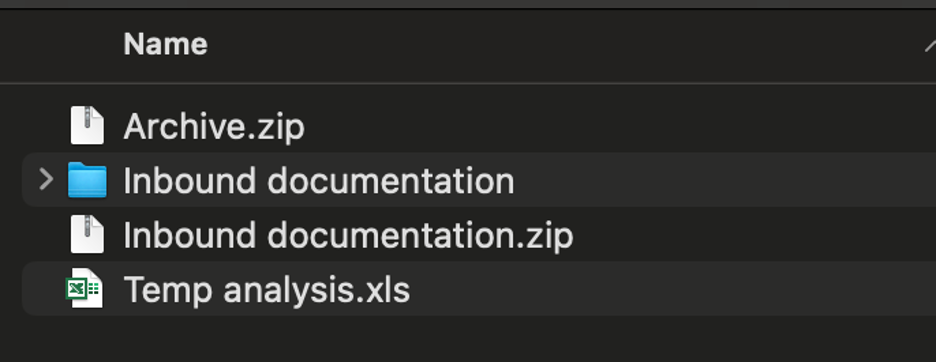
Figure 4 Example of parsed temperature data from a shipment uploaded via “Passive Logger Data”.
Once your files are selected:
Click the “Upload” button in the “Passive Logger Data” tab.
The system will automatically begin parsing the files in the background.
You’ll see a status indicator next to each file once the upload completes.
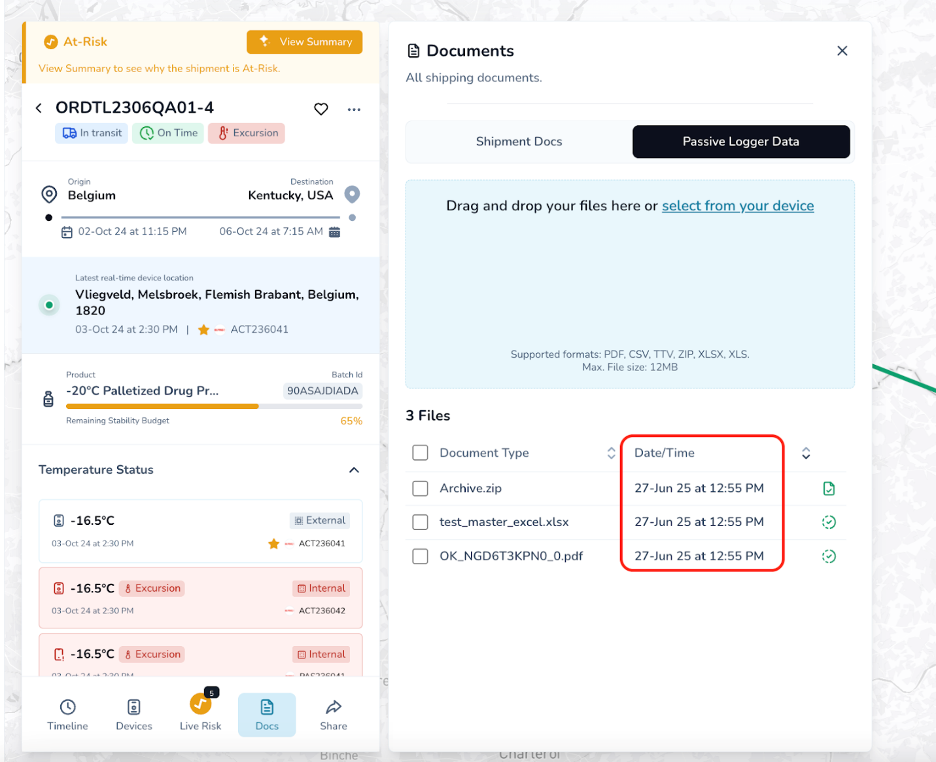
Figure 5 Status indicators confirming successful upload and backend parsing of Passive Logger Data files.
STEP 6 – Navigating to your data:
Once the system finishes parsing the uploaded file(s), you can view the associated logger data by navigating to the Devices tab. (Can take up to 5 mins)
To access the data:
Return to the shipment details page (if not already there).
Click the Devices icon at the bottom of the screen to open the Devices tab.
You will see a list of devices associated with that shipment, including the one from your uploaded TempTale file.
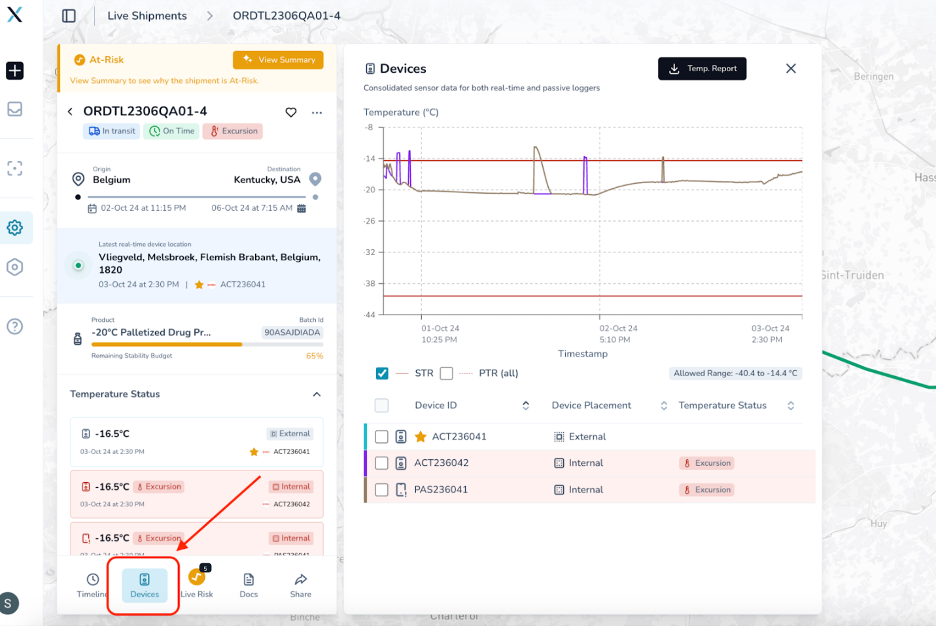
Figure 6 Devices tab showing uploaded and parsed TempTale logger data.
STEP 7 – Viewing your data:
After navigating to the Devices tab, you can view the details of your uploaded TempTale logger.
To view the logger data:
In the list of devices, find the row that matches your Device ID.
Click on the Device ID to open the device detail view.
The system will display the full temperature profile, including timestamped readings, event logs, and associated metadata.
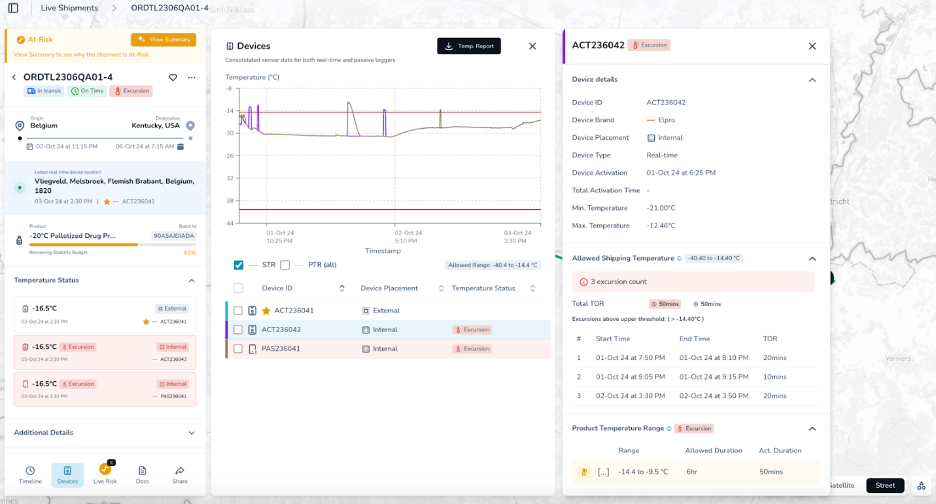
Figure 7 Device detail view showing uploaded and parsed temperature data.
Need Help?
If you experience any issues during the upload process or notice anything unexpected with your data, the PAXAFE team is here to support you.
📬 Contact PAXAFE Support:
Email: support@paxafe.com
✅ When reaching out, please include the shipment ID, device ID (if applicable), and a brief description of the issue to help us assist you quickly.
Support is available 24/7 to ensure continuity of operations.