Workflow Automation Builder
Last updated: May 14, 2026
Overview
Workflow Builder allows organizations to automate operational processes inside CONTXT. When specific events occur, the platform can automatically:
Wait
Check conditions
Trigger actions
Send notifications
Update shipment states
Complete workflows
This article explains:
Core workflow concepts
How to create workflows
How delays and waits function
How to duplicate existing workflows
Common workflow examples
Applies to organizations with the Automation / Workflows feature enabled for their role.
Before You Start
To use Workflow Builder, you need permissions that allow you to:
View workflows
Edit workflows
Enable or disable workflows
These permissions are typically managed through:
User Access Groups
Organization role configuration
If you are building workflows for the first time, it is recommended to:
Start with a low-risk lane
Use a test workflow
Validate behavior before broad rollout
Parts of a Workflow
Each workflow is made up of several building blocks.
Component | Description |
|---|---|
Trigger | The event that starts the workflow |
Condition (If) | Optional logic that determines whether the workflow continues |
Action | What the platform does next |
Delay / Wait | An optional pause before continuing to the next step |
Common Trigger Examples
Triggers may include events such as:
Shipment status changes
Shipment delivery
Temperature Release status changes
Device signals
Workflow state changes
Common Actions
Actions may include:
Sending notifications
Adding tags
Updating shipment status
Marking shipments complete
Notifying external users
Open Workflow Builder
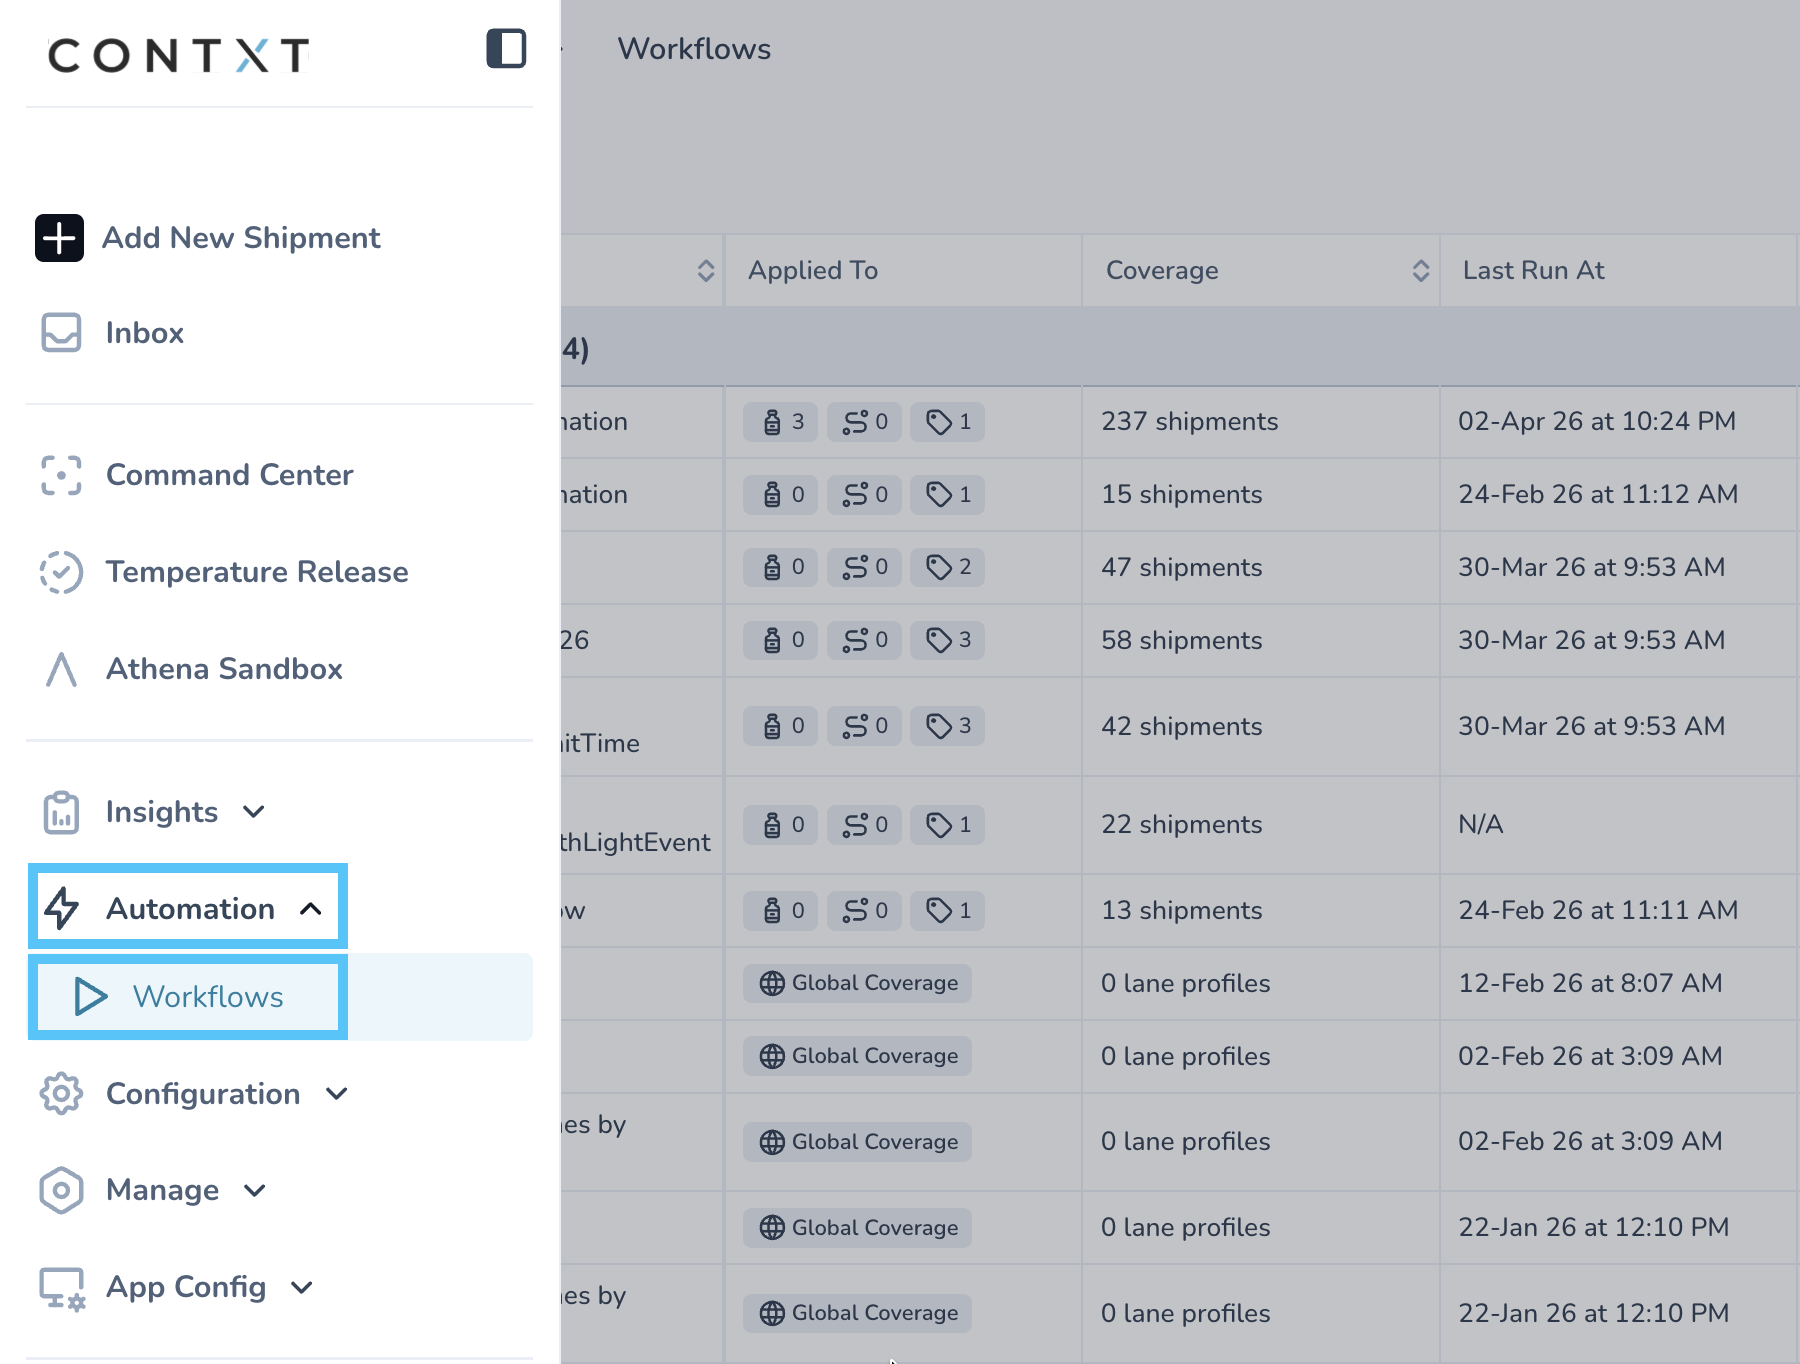
To access workflows:
Sign in to CONTXT
Navigate to Automation
Open Workflows or Workflow Builder depending on your environment
Create a Workflow
Basic Workflow Creation
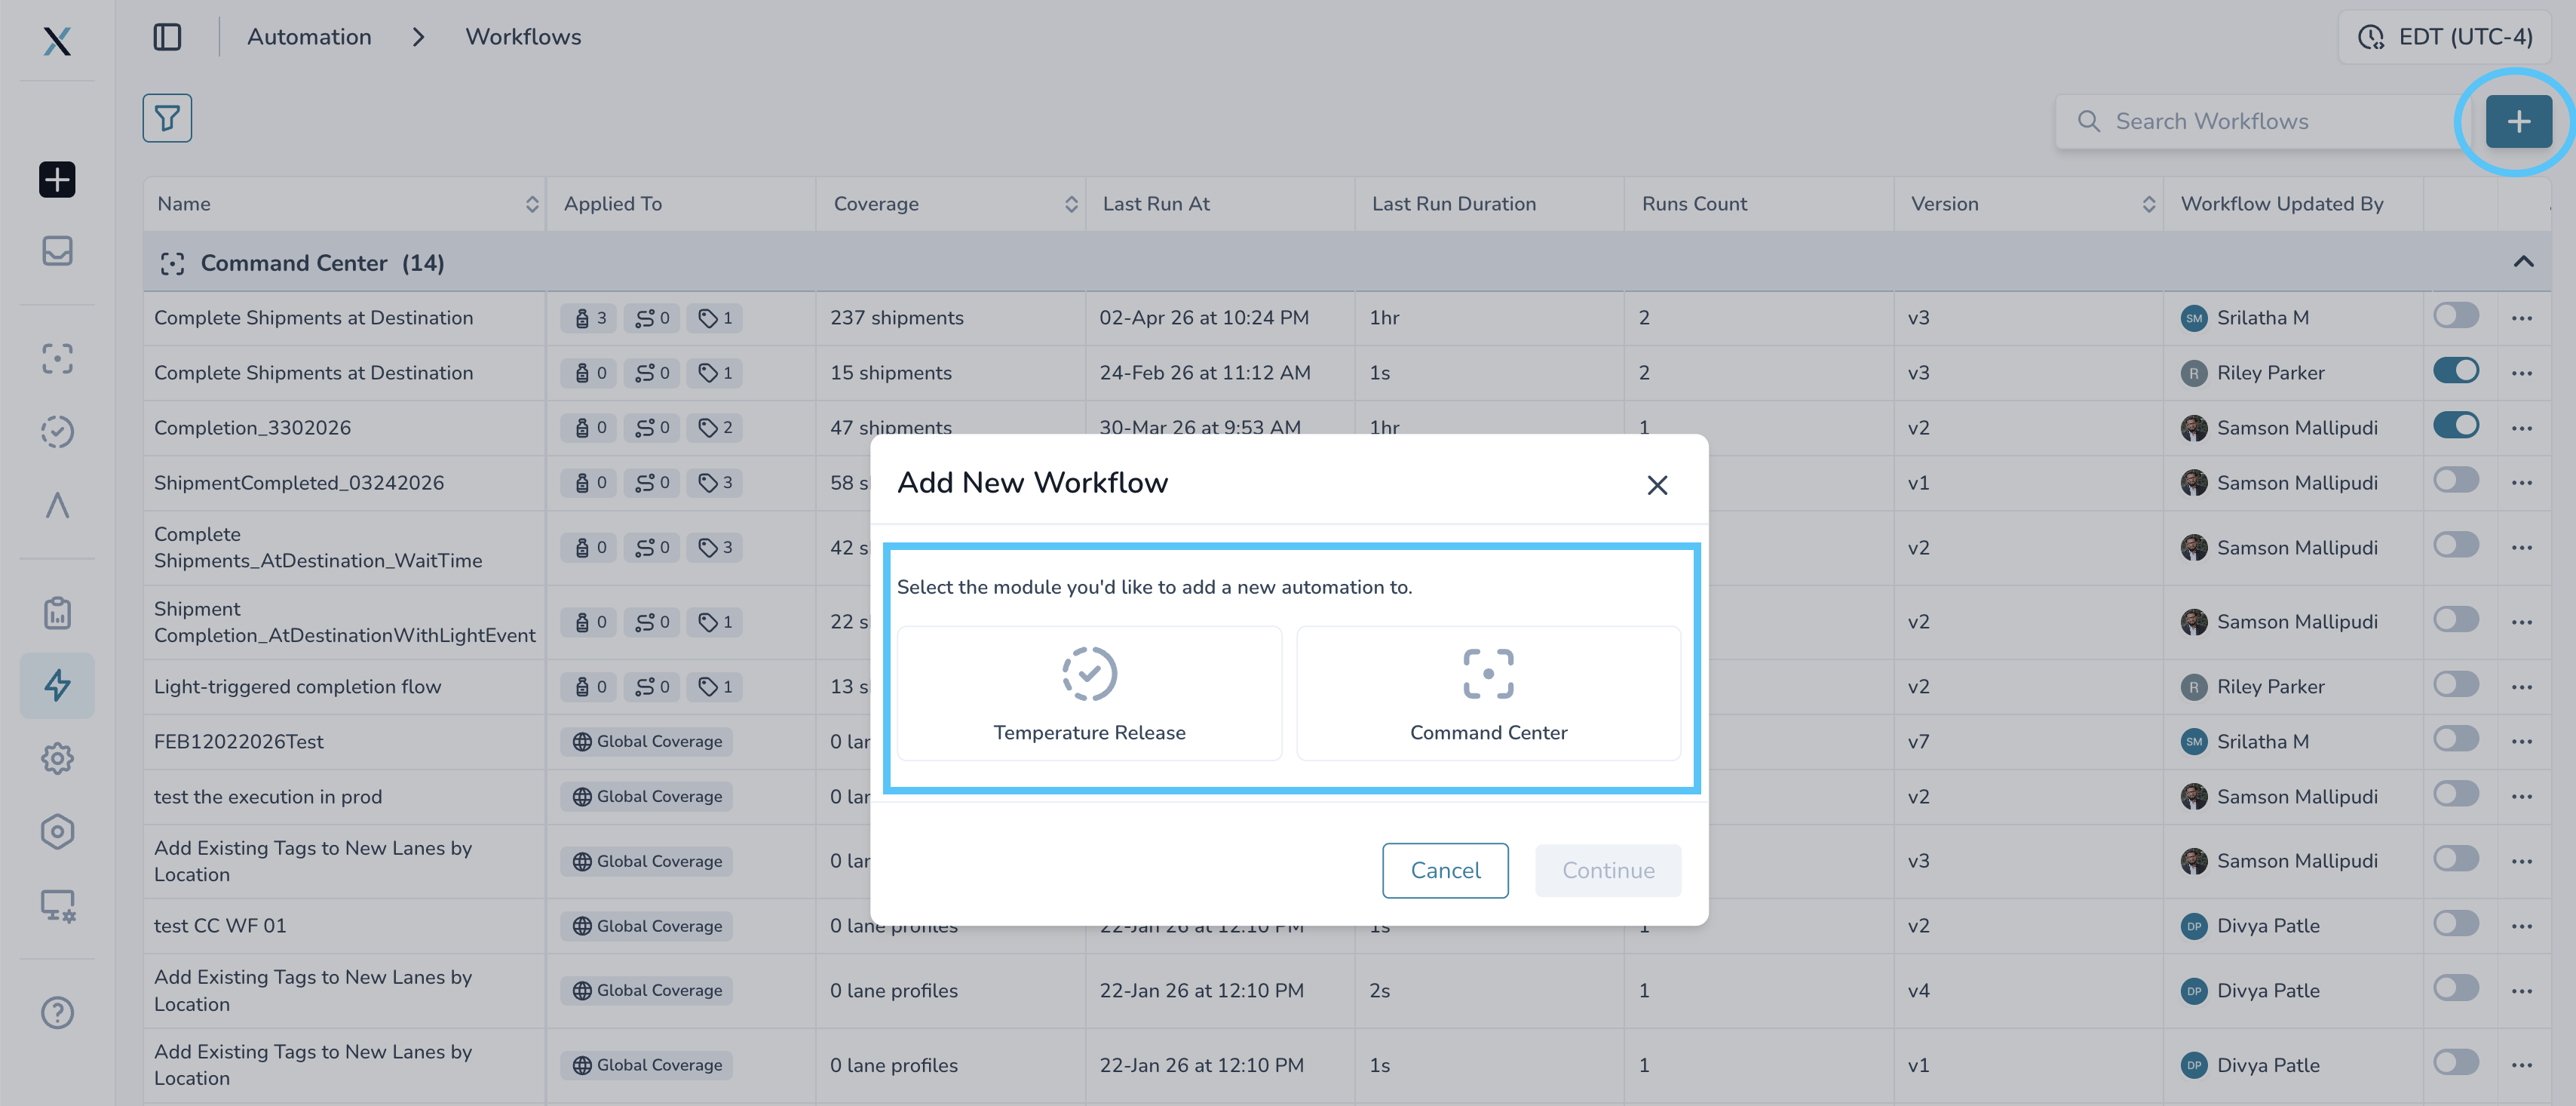
Select Create Workflow or New Workflow
Choose the module:
Command Center
Temperature Release
Select a trigger
Add optional conditions
Add actions
Add delays if needed
Define shipment coverage
Save the workflow
Enable the workflow if it should run automatically
Define Workflow Coverage
Coverage determines which shipments the workflow applies to.
Coverage may be based on:
Lanes
Tags
Shipment attributes
Organization-specific configuration
Configure a Trigger
After selecting a trigger, configure the event details that determine when the workflow should start.
The available configuration options depend on the trigger type selected.
Typical trigger configuration may include:
Shipment statuses
Temperature Release statuses
Device events
Lane or shipment scope
Timing requirements
Specific workflow states
For example:
Trigger Type | Example Configuration |
|---|---|
Shipment Status Changed | Run when shipment status changes to Delivered |
Temperature Release Status Changed | Run when release status becomes Approved |
Device Event Trigger | Run when a light sensor event is detected |
Shipment Completed | Run when shipment enters the completed state |
Some triggers may also allow:
Multiple values
Include/exclude logic
Event timing conditions
Additional filtering rules
After configuring the trigger:
Review the selected criteria
Confirm the workflow starts only under the intended conditions
Test the workflow before enabling it broadly
Tip: Keep triggers as specific as possible to avoid unnecessary workflow executions or duplicate notifications.
Adding A Condition
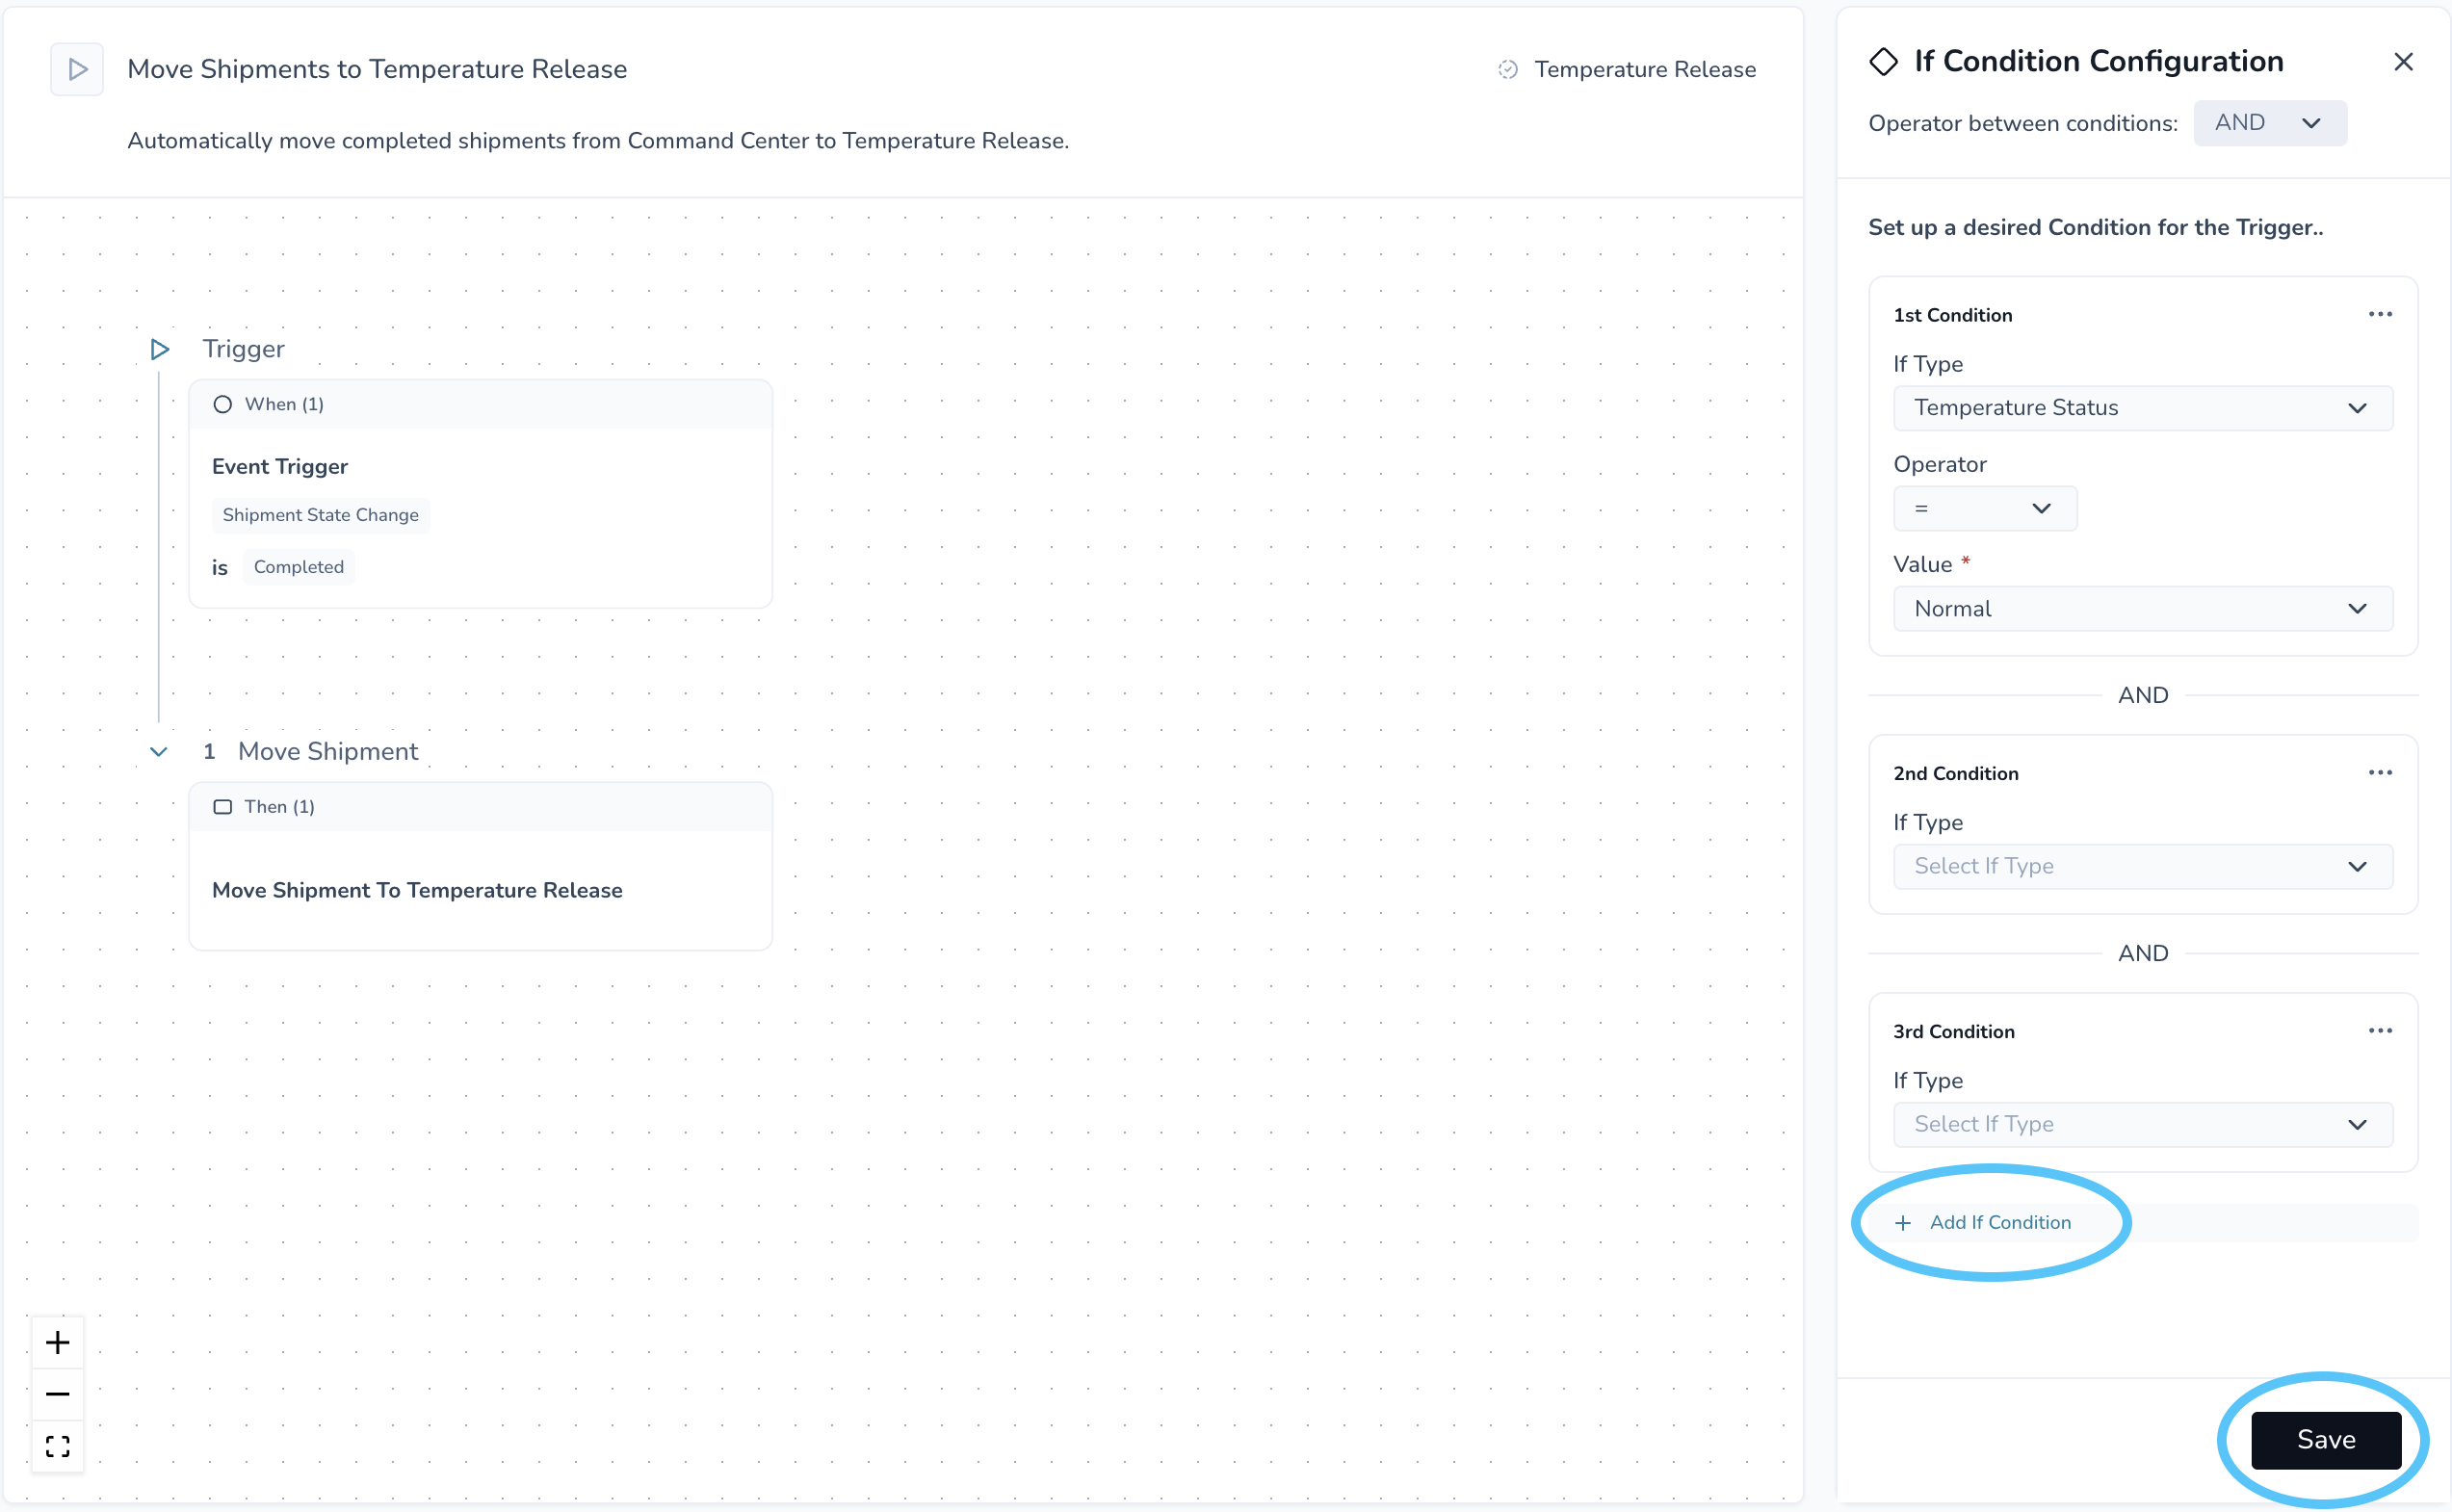
If the workflow allows it, you are able to add conditions to your workflow. Ensure you save prior to moving on.
Duplicate an Entire Workflow Branch
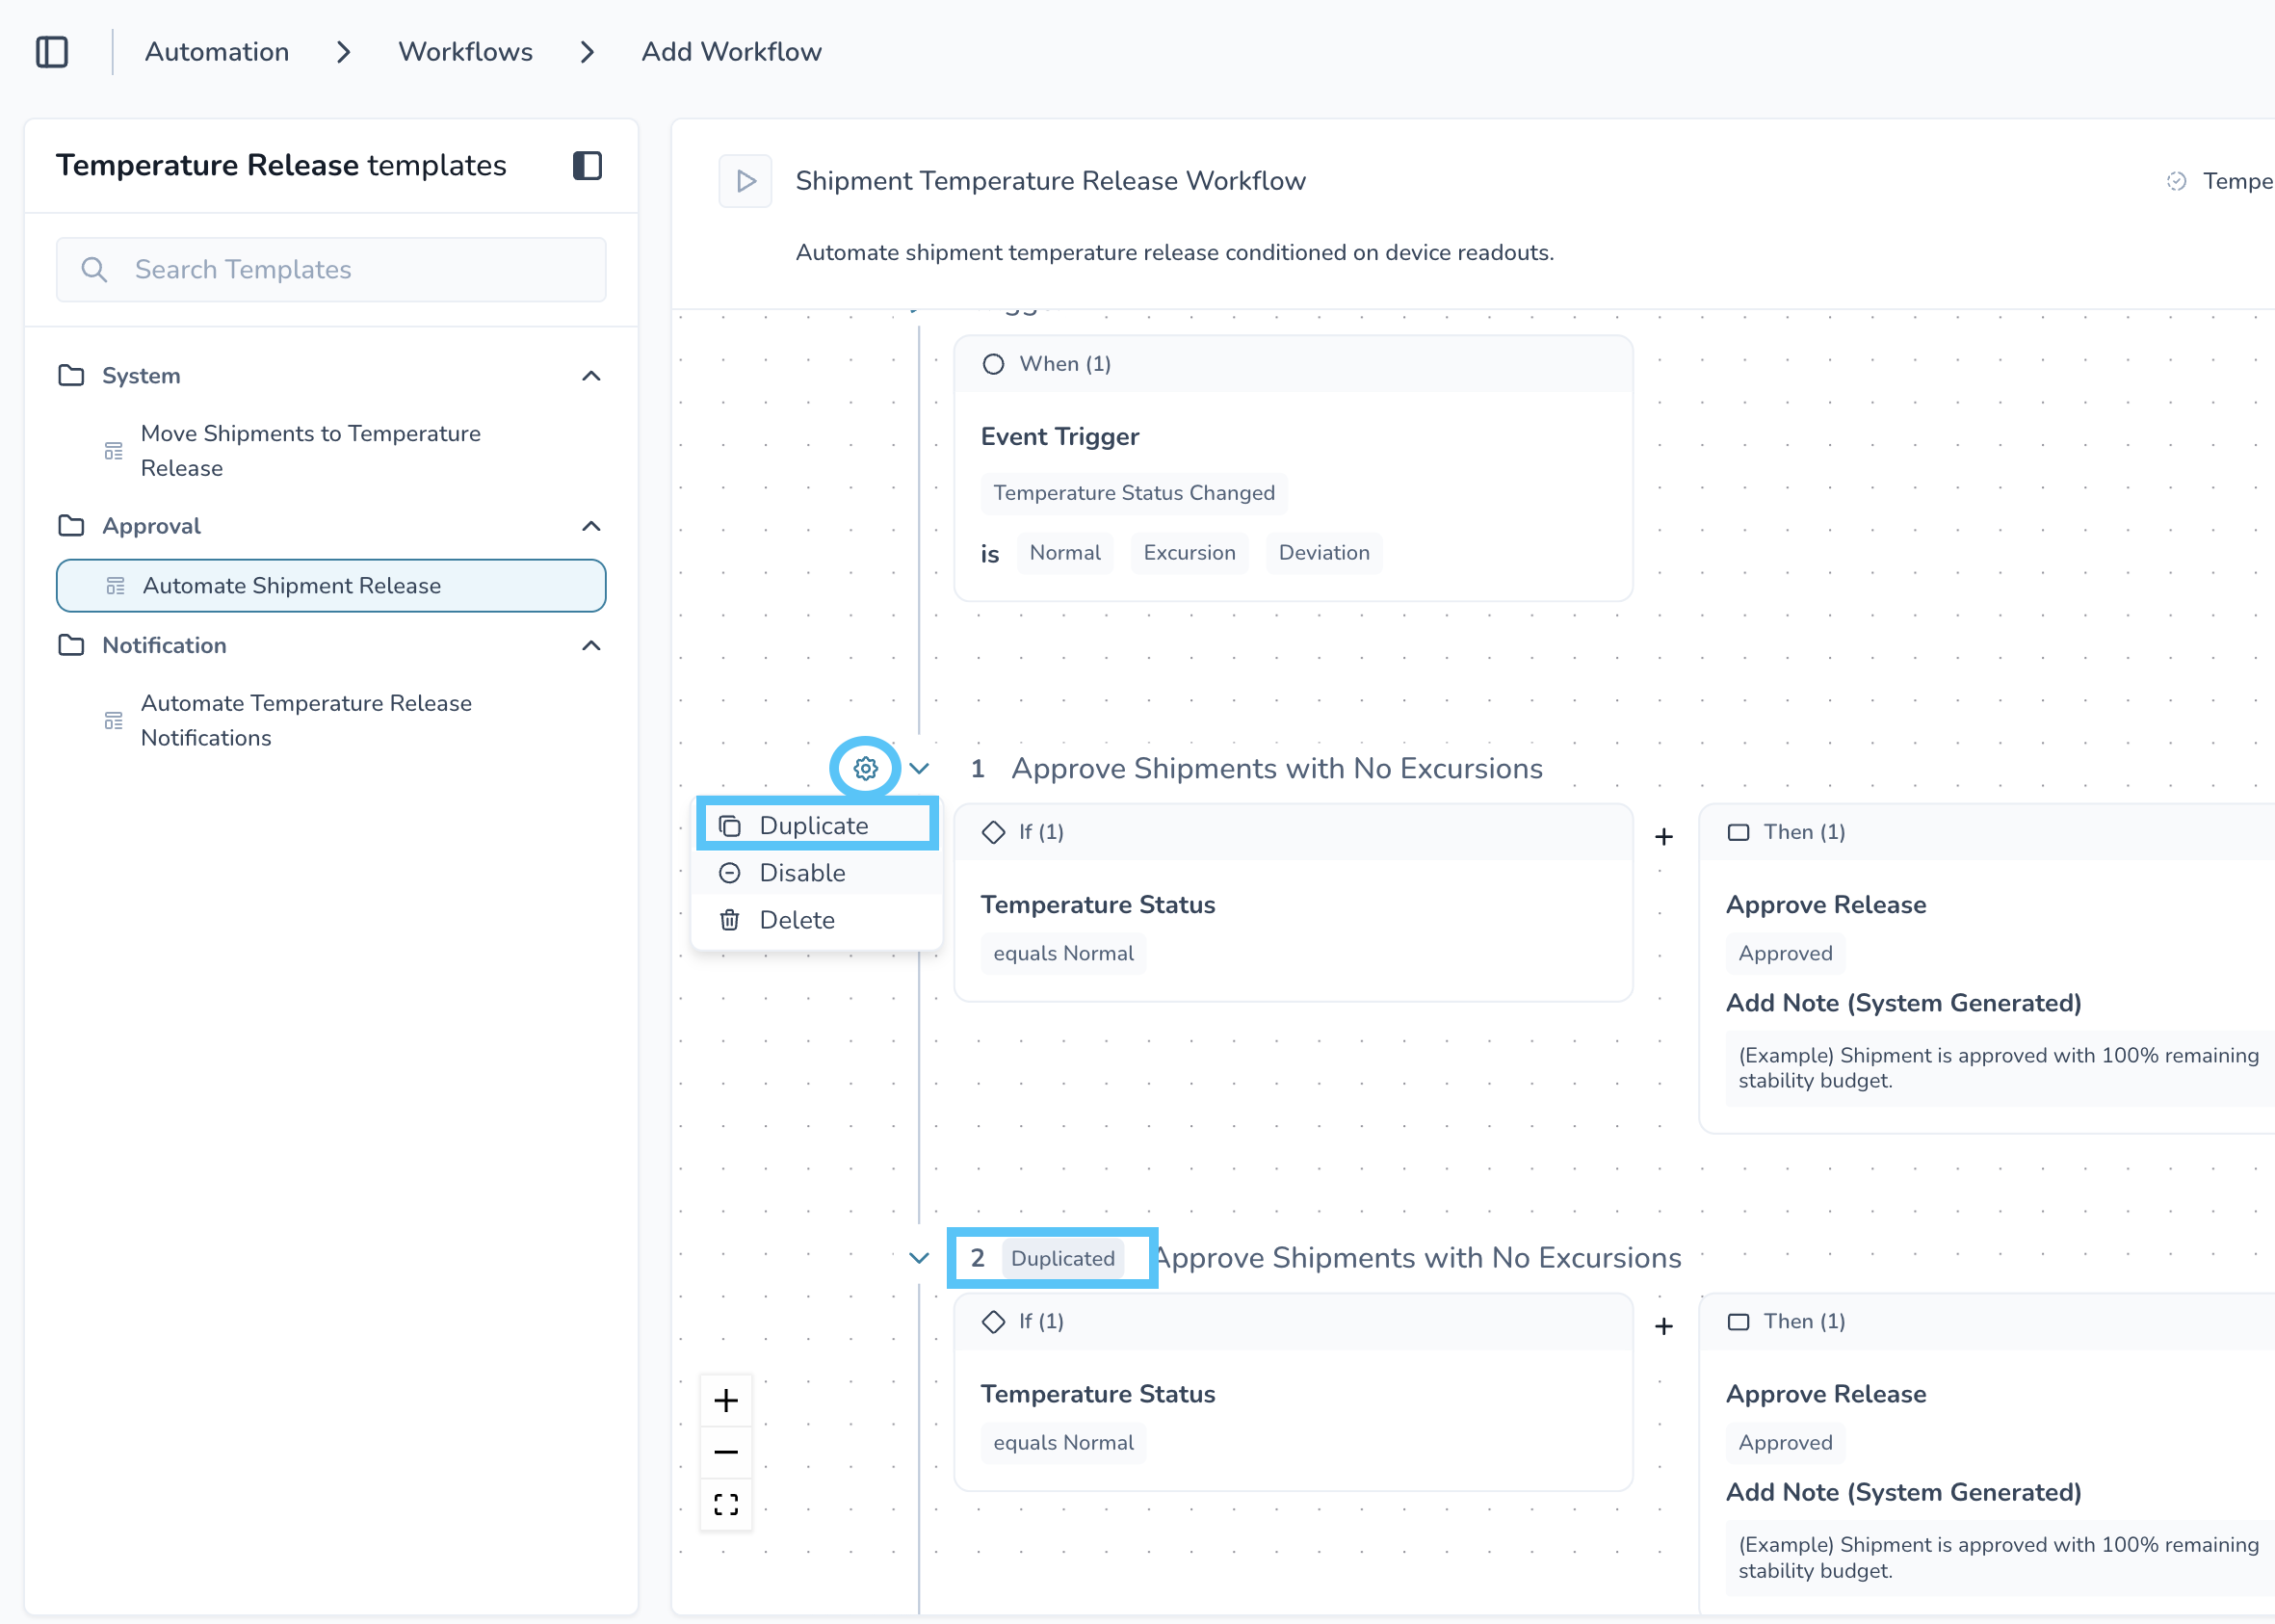
If your workflow includes a horizontal branch or flow containing multiple steps:
Hover over the flow
Open the gear or options menu
Select Duplicate
This copies the entire branch, including all associated:
Conditions
Actions
Delays
Workflow logic
The duplicated branch is typically created as a new flow named similarly to the original with “(duplicate)” appended.
Use this when creating parallel workflow paths with only small variations.
Delays and Waits
Delays allow workflows to pause before continuing to the next step.
This is useful when workflows should wait for:
Device signals
Shipment events
Time windows
Operational buffers
Example: Delivery With Timed Fallback
A common workflow pattern:
Shipment reaches destination
Workflow waits for a package-open or light sensor signal
If no signal occurs within a defined timeframe:
The workflow still completes the shipment
This prevents shipments from remaining open indefinitely.
Configure a Delay
Open the workflow
Select the delay node
Set the wait duration
Save the workflow
Enable the workflow
Workflow History During Delays
While a workflow is waiting:
Workflow history may show the run as Running
Once the wait finishes, the workflow continues automatically
Use workflow history to confirm:
Wait timing
Completion
Errors
Execution state
Best Practice
When configuring delays:
Account for weekends
Consider carrier behavior
Include operational timing buffers where appropriate
Duplicate a Workflow
Duplicating workflows is useful when:
A workflow already exists with similar logic
You only need small adjustments
You want to reuse an existing template
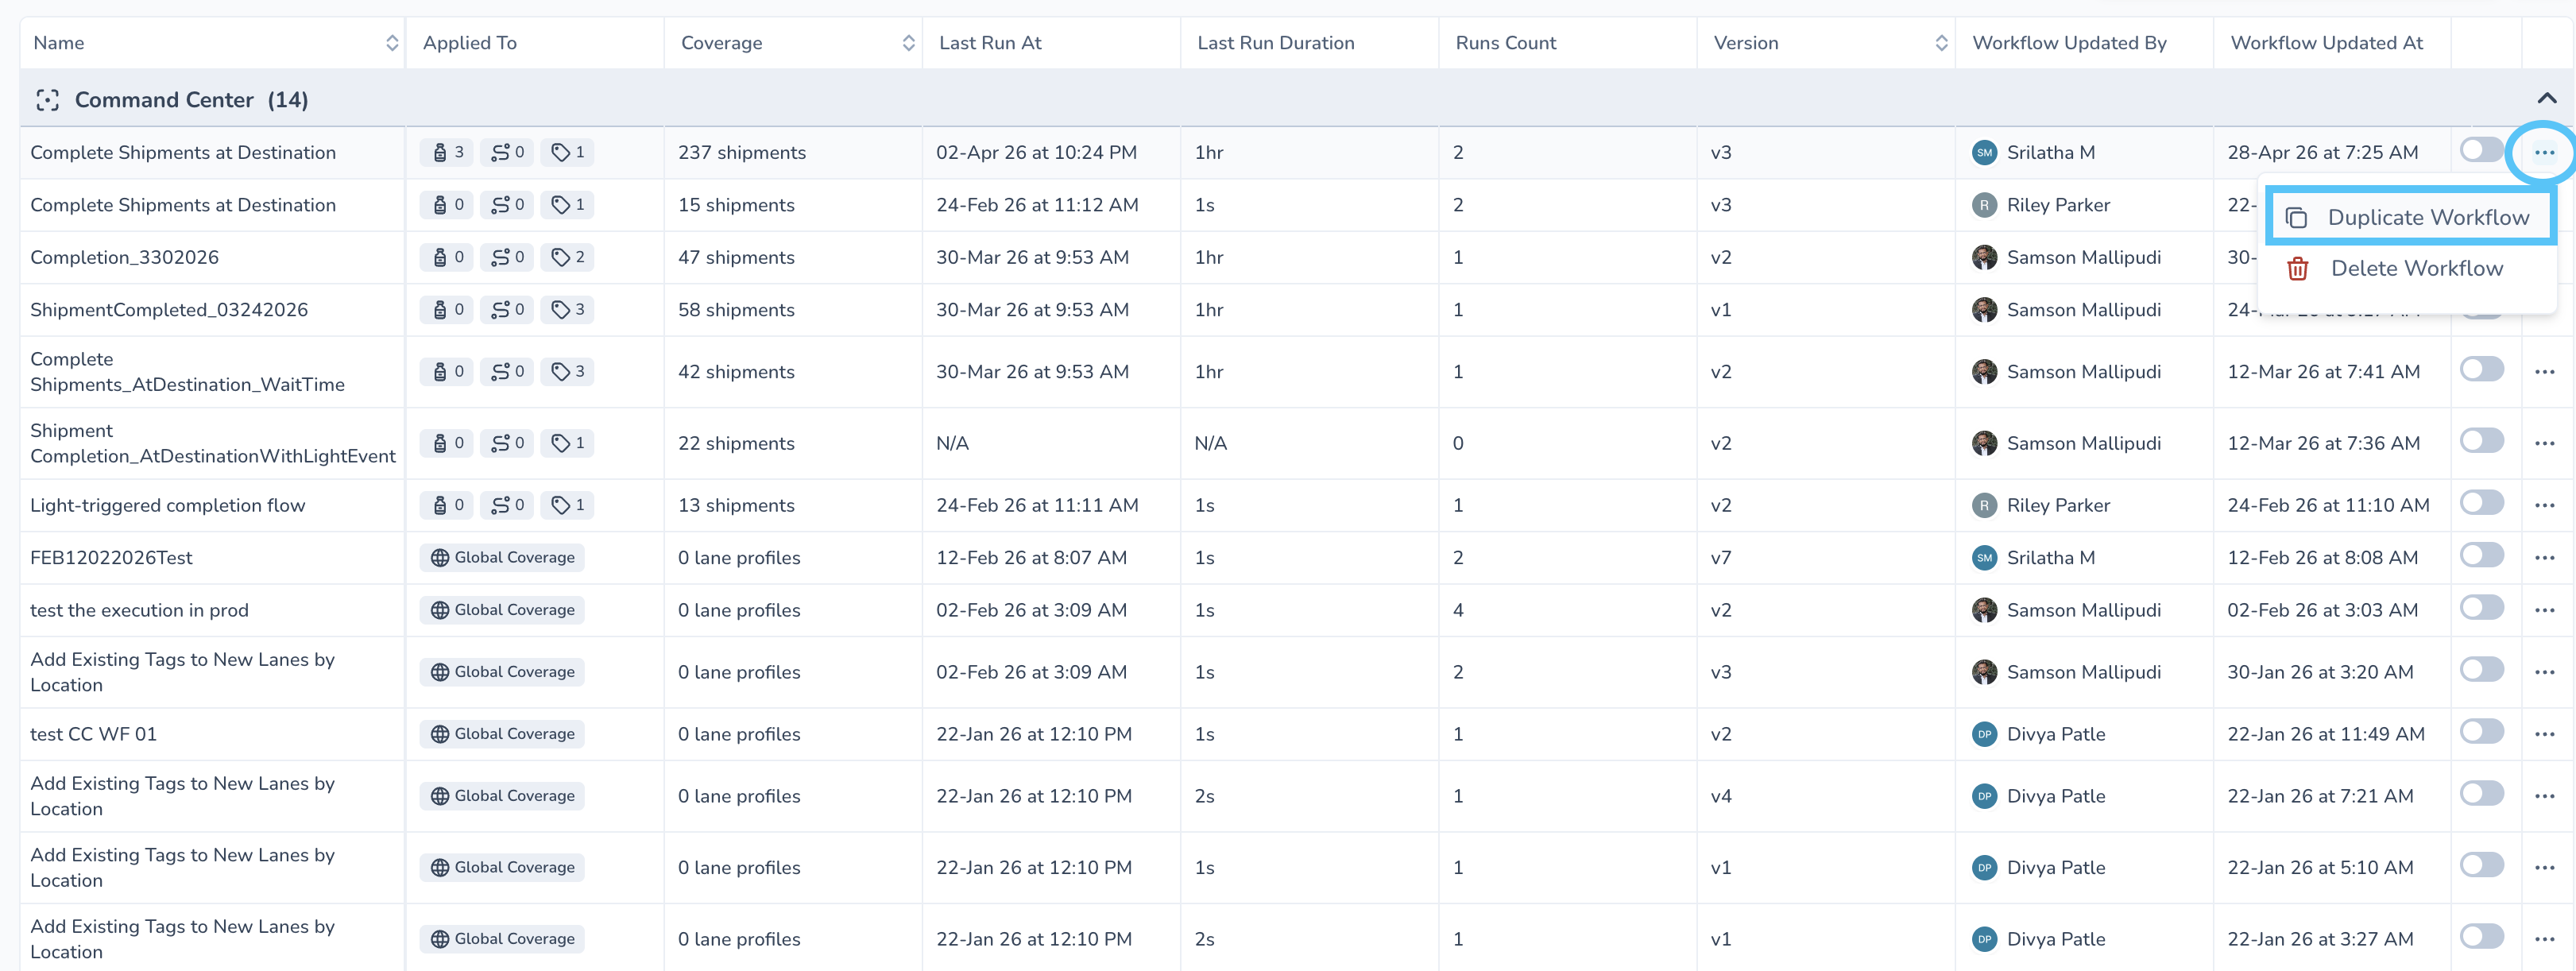
Navigate to Automation → Workflows
Locate the workflow
Open the workflow row menu (commonly ⋮ or More)
Select Duplicate Workflow
Confirm duplication if prompted
Open the copied workflow
Update:
Workflow name
Coverage
Conditions
Recipients
Actions
Save and enable the new workflow
Important
If duplicate or delete options are unavailable, your role may only include view permissions.
Shipment Completion Templates
Many organizations begin with prebuilt workflow templates.
Template names may vary by tenant or release.
Light Sensor → Complete
This workflow:
Detects a package-open or light signal
Confirms the shipment is delivered or at destination
Automatically marks the shipment complete
State Change → Light Check With Timed Fallback
This workflow:
Detects delivery or arrival
Waits for a light/open signal
Completes the shipment after a configured timeout if no signal occurs
This prevents operational delays caused by missing sensor confirmation.
Proof of Delivery (POD) Completion
This workflow completes shipments after:
Proof of delivery
Document confirmation
Configured integration signals
Availability depends on:
Integrations
Tenant configuration
Release support
Temperature Release Notifications
Workflow Builder can automate Temperature Release notifications when status changes occur.
This includes:
Internal users
External contacts (where enabled)
Example Notification Workflow
Trigger
Temperature Release status changes
Optional Conditions
Examples:
Excursion exists
Specific release status
Shipment type
Action
Send notification
Notify external users
Message Variables
Notification actions may support variables such as:
Shipment ID
Status
Device details
Lane information
Temperature data
Available variables depend on your environment and workflow configuration.
Understanding “Lane” and Workflow Coverage
A lane represents a saved shipment route and transport configuration.
This may include:
Origin
Destination
Transport mode
Associated settings
Simple Workflow Coverage Guidance
Rather than applying workflows globally:
Assign workflows only to:
Relevant lanes
Relevant tags
Specific shipment groups
This helps avoid unnecessary workflow executions across unrelated shipments.
Troubleshooting Workflow Issues
Issue | What to Check |
|---|---|
Workflow never runs | Confirm the workflow is enabled and shipment coverage matches |
Workflow stuck on “Running” | Check whether a delay is still active |
Too many notifications | Review workflow conditions and overlapping workflows |
Missing buttons or controls | Confirm your role includes workflow administration permissions |
Best Practices
Keep Workflows Focused
Each workflow should have:
One clear operational purpose
A descriptive name
Test Before Broad Rollout
Before enabling workflows widely:
Test on one lane
Validate conditions
Confirm notification behavior
Review Workflow History
After workflows go live:
Periodically review execution history
Monitor failures
Confirm timing behavior
Document Internal Logic
Maintain internal documentation explaining:
Why triggers were chosen
Why delays exist
Escalation expectations
Notification ownership
This is especially helpful during:
Audits
Operational handoffs
Team transitions
Support
For workflow support, contact:
Email: support@paxafe.com
When contacting support, include:
Workflow name
Approximate issue time
Affected shipment ID
Workflow history screenshots if available