Changelog: CONTXT v1.1.0
Last updated: December 9, 2025
Released October 31, 2025
We're pleased to introduce Command Center v1.1, featuring an enhanced user invitation workflow that streamlines access management for your organization. Administrators can now assign User Access Groups directly during the invitation process, eliminating extra configuration steps and ensuring new team members have immediate access to the right data when they join.
🆕 What's New
Custom User Invitation with Multi-Group Assignment ⭐
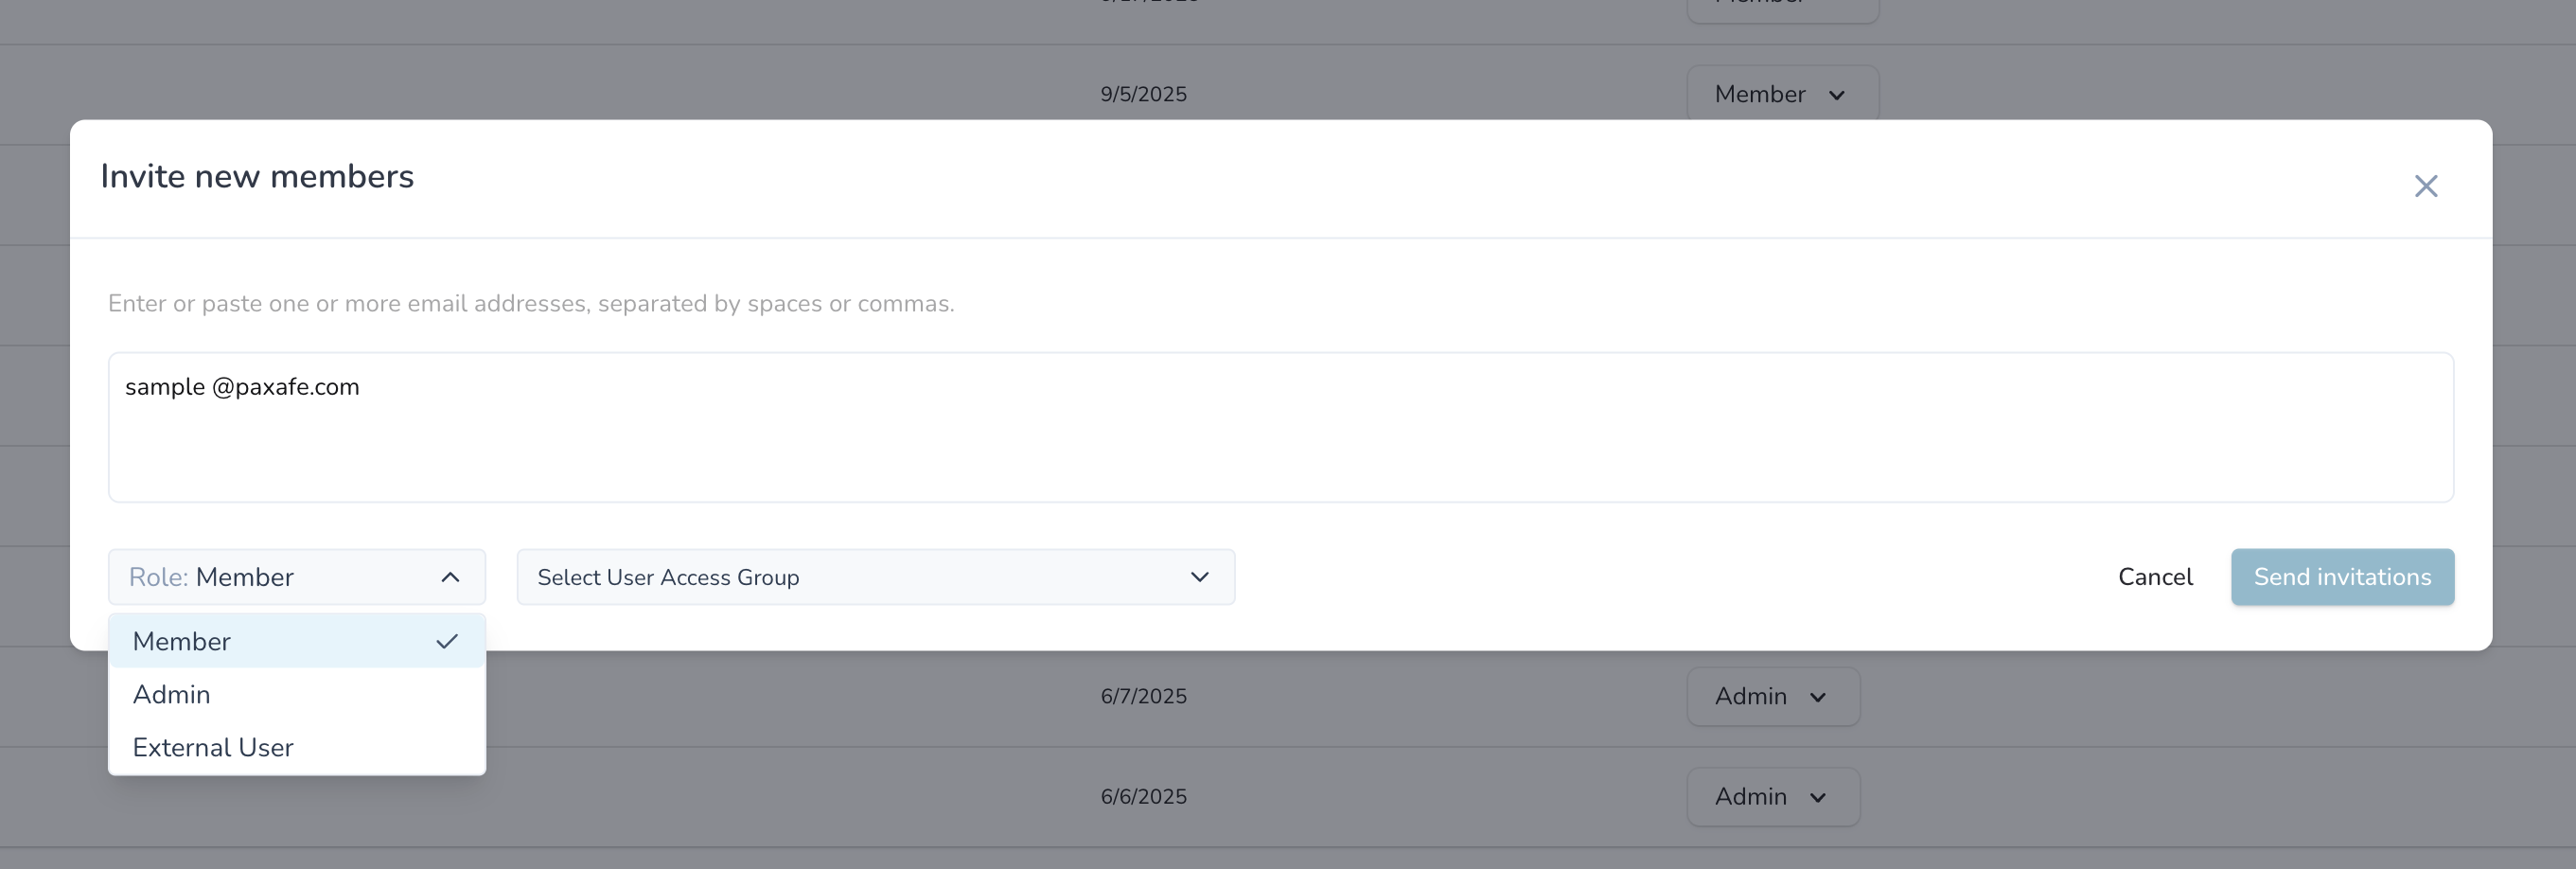
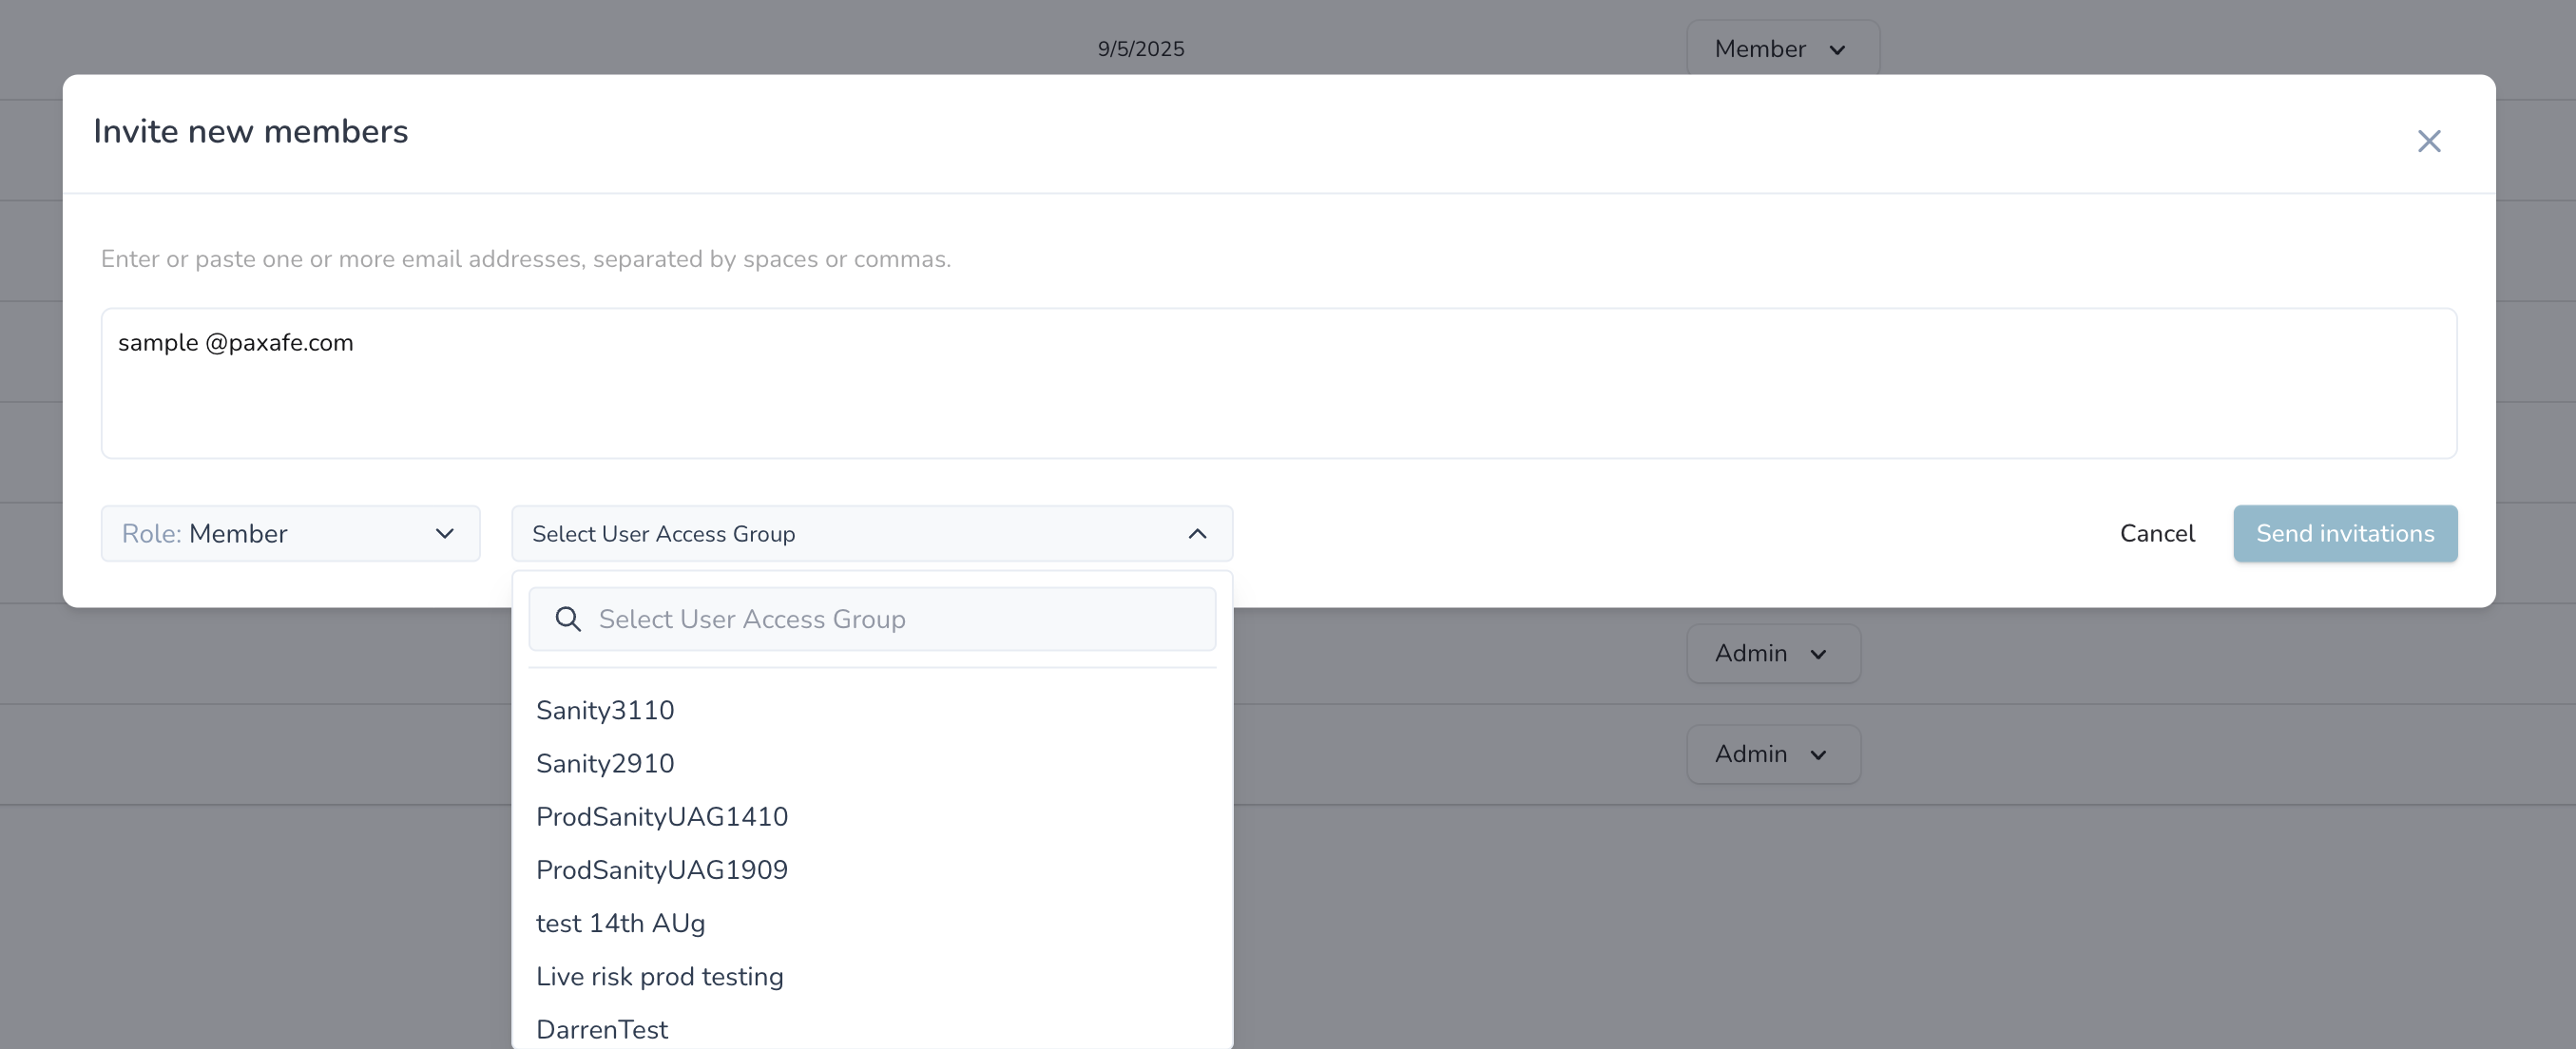
Assign access permissions during invitation instead of after
Bulk user invitations: Invite multiple users at once by entering multiple email addresses separated by spaces or commas - the system validates each email and displays them as individual chips
Multi-group selection: Choose one or multiple User Access Groups to assign to your invited users instead of selecting groups one at a time after they join
Searchable access groups: Find specific User Access Groups quickly using the built-in search field when your organization has many groups
Immediate access: New users automatically get assigned to selected User Access Groups when they accept their invitation - no additional configuration needed
Visual confirmation: See exactly which User Access Groups you've selected through a chip-based display with easy removal options
Why this matters: Reduce user onboarding time. New team members get immediate access to the correct shipments, lanes, and data when they join, instead of waiting for manual permission configuration after account creation.
Feature Access Control for User Access Groups ⭐
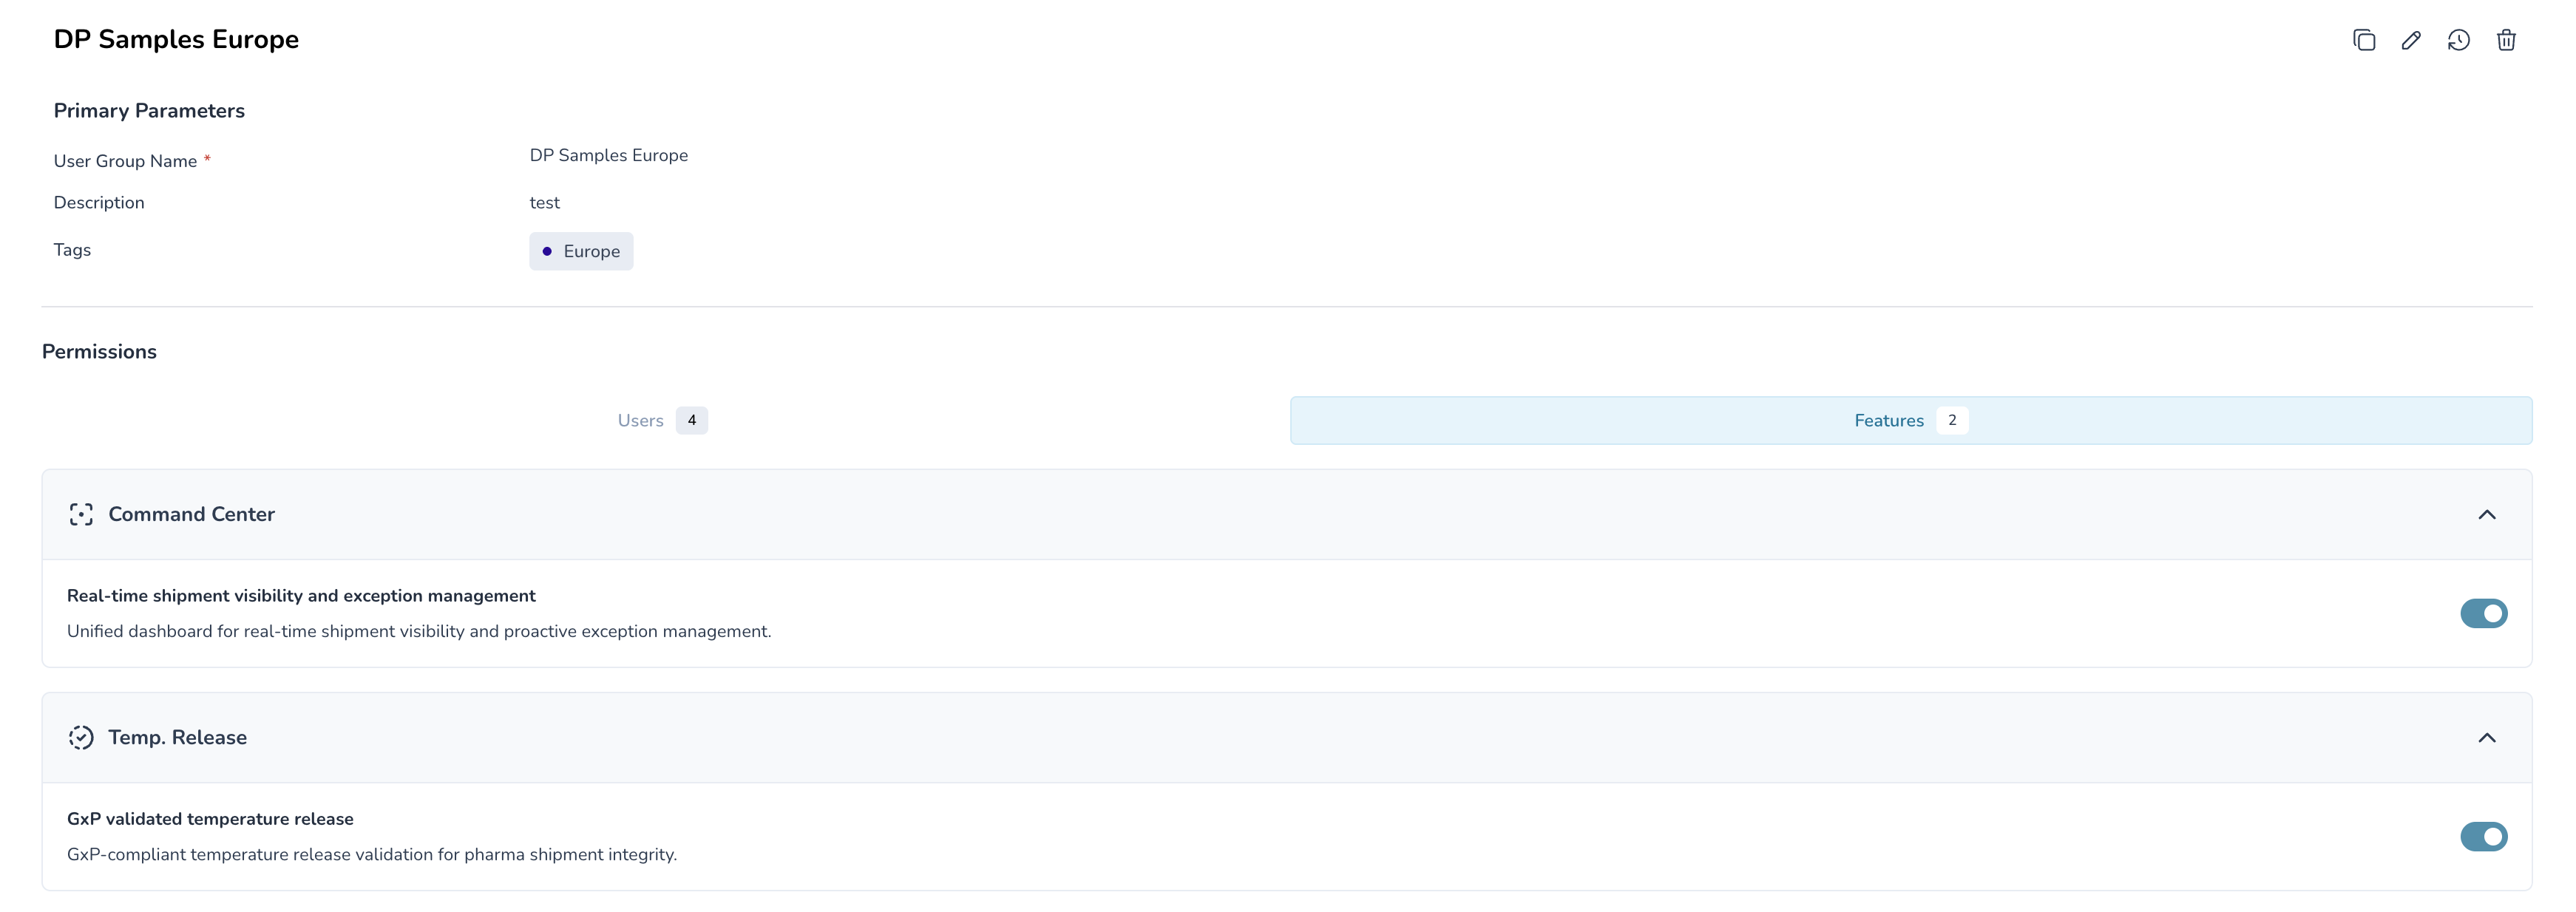
Control which features users can access through the User Access Group configuration
Feature-level permissions: Enable or disable specific platform features (Command Center, Temperature Release, etc.) for each User Access Group using simple toggle switches
Tag-based data filtering: Assign tags to User Access Groups to control which shipments and data users can view - users only see data matching their group's tags
Role-based data access: Admin users see all data regardless of tags, while Member and External users only see data matching their UAG tags
Feature access applies to all roles: Feature toggles affect all users equally - if a feature is disabled for a UAG, even Admins in that group cannot access it
Multi-group inheritance: Users in multiple User Access Groups can access features enabled in any of their groups and see data tagged in any of their groups
Flexible segmentation: Create access groups by region (Europe, Americas), customer (CustomerA, CustomerB), or function (Warehouse, QA, Compliance) with appropriate feature and data access
📊 Understanding Access Control
How User Access Groups Work
User Access Groups control two types of permissions that work together:
Data Access Rules (Tag-Based)
Your Role | What Data Do You See |
Admin | ALL shipments and data, regardless of UAG tags |
Member | Only shipments matching your UAG's assigned tags |
External User | Only shipments matching your UAG's assigned tags |
Example: If your "Europe Operations" UAG has the "Europe" tag assigned:
Admin in this UAG: Sees Europe shipments + Americas shipments + all other shipments
Member in this UAG: Sees only Europe shipments
External User in this UAG: Sees only Europe shipments
Feature Access Rules (Toggle-Based)
Your Role | What Features Can You Use |
Admin | Only features enabled in your UAG(s) |
Member | Only features enabled in your UAG(s) |
External User | Only features enabled in your UAG(s) |
Example: If your "Europe Operations" UAG has Command Center enabled but Temperature Release disabled:
Any role in this UAG: Can access Command Center, cannot access Temperature Release
Multiple User Access Groups
If you're assigned to multiple UAGs, you get the combined benefits:
Data Access: See shipments matching tags from ANY of your groups
UAG 1 tags: Europe, UK
UAG 2 tags: Moderna, Pfizer
You see: Shipments tagged Europe OR UK OR Moderna OR Pfizer
Feature Access: Use features enabled in ANY of your groups
UAG 1 features: Command Center ✓, Temp Release ✗
UAG 2 features: Command Center ✓, Temp Release ✓
You can use: Command Center AND Temperature Release
Notifications: Receive one notification per event, even if the shipment matches multiple UAG tags
You're in UAG with the "Europe" tag and UAG with the "UK" tag
Shipment tagged "Europe" and "UK" completes
You receive: One completion notification (not two)
💡 Tips & Best Practices
🎯 Make the most of User Access Groups:
Plan your UAG structure first: Create and organize your User Access Groups with appropriate tags and features before inviting users
Use descriptive UAG names: Name groups clearly (e.g., "Europe Operations Team" instead of "Group1") so they're easy to identify
Start with fewer, broader groups: Begin with regional or functional groups before creating highly specific ones
Review Admin vs Member differences: Remember Admins see all data regardless of tags, but feature access applies equally to all roles
Document your UAG strategy: Keep notes about which UAGs, tags, and features should be assigned for different job roles
🔧 Feature toggle best practices:
Enable features progressively: Start with essential features enabled, add advanced features as users become familiar with the platform
Match features to user needs: Don't enable features users won't use - it simplifies their interface and reduces confusion
Use UAGs for phased rollouts: Create a "Beta Users" UAG with new features enabled before rolling out to the entire organization
Consider feature dependencies: Some workflows require multiple features (e.g., full shipment lifecycle needs Command Center + Temperature Release)
Test feature combinations: Verify workflows work correctly with your specific combination of enabled features
📊 Tag management best practices:
Keep tag taxonomy simple: Use clear, hierarchical tags (e.g., Region > Country > City) rather than overlapping categories
Tag at appropriate granularity: Tag shipments at the level users need to see them (customer-level, region-level, or lane-level)
Avoid too many tags per UAG: Users in UAGs with many tags may see more data than they need - keep groups focused
Review tag usage regularly: Check which tags are actually being used on shipments and adjust UAG configurations accordingly
🔍 Search tips:
UAG search is case-insensitive - type "kentucky" to find "Kentucky Lane Viewers"
Search matches partial names - type "lane" to see all lane-related groups
Search updates results as you type for quick filtering
📧 Email entry tips:
Copy-paste email lists directly from spreadsheets or other tools
Mix comma and space separators - system handles both formats
Remove duplicate entries before sending (system prevents them automatically)
Invalid email formats are rejected immediately with clear error messages
🚀 Getting Started
These enhancements are automatically available in your Command Center dashboard. No configuration changes required.
To configure User Access Group features:
Navigate to Organization settings → User Access Groups
Select an existing User Access Group or create a new one
Configure Primary Parameters:
Set User Group Name (required)
Add Description (optional)
Assign Tags for data access filtering
Go to the Features tab
Toggle features ON/OFF:
Command Center: Real-time shipment visibility and exception management
Temperature Release: GxP-compliant temperature release validation
Additional features will appear here as they become available
Go to the Users tab to see which users have access to this UAG
Save changes
To invite your first user with UAG assignment:
Go to Organization settings
Click "Invite" button (new custom interface)
Enter email address:
newuser@yourcompany.comKeep default role as "Member" (or select Admin/External User)
Click "Select User Access Group" dropdown
Search for or select relevant groups (e.g., "Production Shipments", "Kentucky Lane")
Click "Send invitations"
User receives email invitation
When they accept and create account, they immediately have access to selected groups
🆘 Need Help?
Questions about User Access Groups? Contact your Customer Success Manager for UAG structure best practices
Setting up access for new teams? We can help you design an optimal UAG hierarchy for your organization
Technical issues? Submit a support ticket through the help desk
Feature requests? Share your feedback through the in-app feedback tool
Thank you for using Command Center. We're committed to continuously improving your logistics management experience with streamlined workflows that save you time.